Thursday, September 22, 2022
Altenew Inspiration Challenge
Friday, August 26, 2022
Altenew-Make It Masculine
Hi friends! Altenew Certified Educators are joining a fun Instagram hop and the theme is "Make It Masculine" showing off projects for the men in your life. The hop starts from @altenewllc, so make sure you start from the beginning. Altenew is giving away a $20 gift certificate to 5 lucky winners! For a chance to win, please follow @altenewllc and vickie.davis77 and leave a comment by 09/01/2022.
Altenew will draw 5 random winners from the comments left on each stop of this Instagram hop and announce the winners on Altenew's Educator Instagram hop post on 09/02/2022.
Even though I prefer floral cards, I do have a need for the occasional masculine card. I have several samples to share with you today,
I started this card by ink blending Galactic Stream, Orange Cream and Just Green inks onto a piece of white cardstock. After this was completed, I dry embossed the piece using the Organic Linen Embossing Folder. Using a finger dauber, I inked various areas with Versa Mark Embossing Ink, applied Rose Gold Embossing Powder and heat set it. I cut this piece down to leave a space for my partial sentiment and heat embossed this on my card front using the same embossing powder. My card is made from the Spicy Yogurt card stock. This is a card stock everyone should try! I cut the Happy Die once from some brushed gold cardstock and twice from white card stock. These were glued together for dimension and then attached to my card front. A bow and brad from my stash were also added.
Below is a card I made awhile back using leftover pieces that I die cut from aluminum foil colored with alcohol markers. I also used the same die to dry emboss on the card. This is an easy fun fold card. The design is very adaptable to a variety of stamps and ideas.
I used the Fine Frames Diamond Die Set for my die cuts and embossing. The Happy Birthday is from the Birthday Greetings set. I colored the letters with the same alcohol markers to match my die cuts. The inside greeting is from the Just A Number Stamp Set.
Lastly, I created a card to resemble metal. At least, that is what it reminds me of. This card is a mini slim line size, perfect for a regular envelope.
After adhering aluminum foil to cardstock, I dry embossed the piece using the Illusion Triangles 3D Embossing Folder. Even though it was hard to capture in the photos, I ran a black ink pad over the embossed piece to give it a slightly distressed look. I attached this to my card front, added a black frame and my die cuts. I used the Bold Greetings Die Set for my Hello.
I used black cardstock with a tiny bit of shine for my die cuts. I think guys need a tiny bit of bling!
HAPPY STAMPING!
Tuesday, August 9, 2022
Ink Blending in a Different Way
After watching Erum Tasneem on Instagram, I had to give this technique a try. Below is a quick step by step tutorial.
1. Rub bright colored ink pads over your cardstock in a random pattern.
2. Dry emboss with the embossing folder of your choice.
3. Ink blend brown ink or ink of your choice over the whole panel.
4. Emboss again with the same embossing folder. It is easy to line it up.
5. Attach to a folded card.
6. Embellish as you wish.
This is a quick and fun technique and I plan to try it again soon with different inks. I may even try it with Distress Oxide Inks.
HAPPY STAMPING!
Monday, April 18, 2022
Altenew Dahlia Bright Eyes
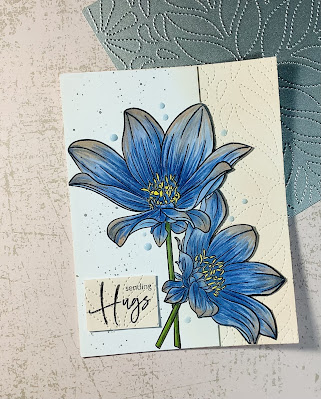
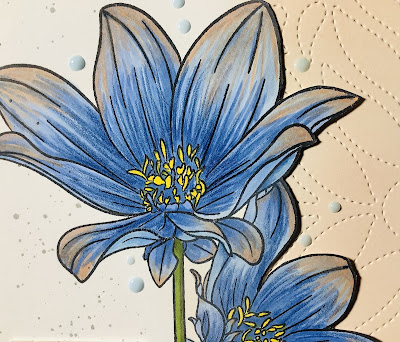
I fussy cut the edge, ink blended the edge of an underlying piece of card stock and debossed the inked edge with the Dotted Tile Debossing Cover Die. A few black splatters and light blue crystal drops were also added.
The sentiment was stamped onto another small piece of ink blended card stock and the sentiment stamped in black. The sentiment is from the Magnolia Ballerina set. I also debossed the sentiment for added dimension.
I hope you enjoyed today's card.
Happy Stamping!
Altenew April Inspiration Challenge
It has been a long winter here! I woke up to snow on the ground again! Next winter may be a time for travel to a warmer climate! This m...

-
I am excited to be part of Blog Hop #2 for the Altenew Boho Chic Release. The hop begins at the Altenew Card Blog https://wp.me/p6Dps1-h...
-
Today,I am participating in a blog hop by Altenew. The craft industry has many outstanding companies with wonderful products! Altenew is b...
-
YAY! I passed my Level 1 final challenge and am moving on to Level 2. I am so excited to continue to learn from these fantastic instructor...


.JPG)
.JPG)
.JPG)


.JPG)


